Tag: DIY garden projects

  • How to Constructing a Raised Garden Bed for Small Spaces

    How to Constructing a Raised Garden Bed for Small Spaces

    Introduction

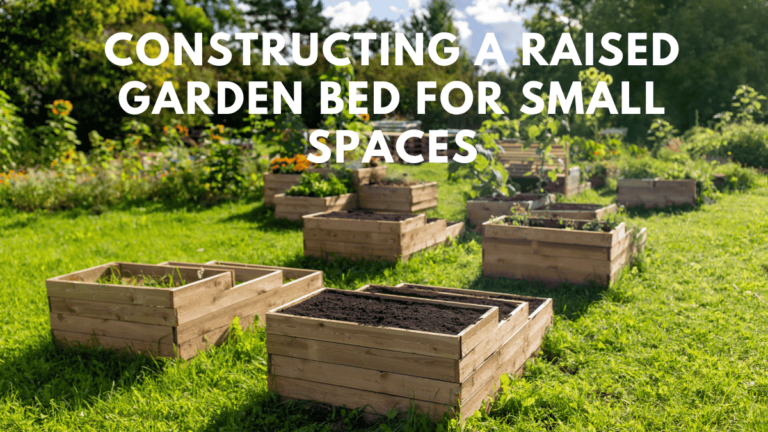
    When it comes to enhancing your garden and growing your own food, building a raised garden bed is one of the most effective solutions. A raised garden bed allows you to grow a variety of plants in controlled conditions, even if you don’t have the ideal soil in your backyard. If you’ve ever wondered how to make a raised garden bed, this guide is for you.

    In this comprehensive article, we will explore everything you need to know about raised garden beds—why they are beneficial, how to build them, and what materials work best. Whether you’re a beginner or an experienced gardener, you will find valuable insights, tips, and step-by-step instructions that will guide you through creating the perfect DIY raised garden bed. We’ll also touch on the importance of using recycled materials, ensuring your project is not only efficient but also eco-friendly.

    Why Build a Raised Garden Bed?

    Raised garden beds, also known as planter boxes, are more than just a functional gardening solution—they are a beautiful addition to any garden space. When designed correctly, they offer various advantages over traditional gardening, particularly in urban settings or areas with poor soil conditions. Raised beds provide better drainage, easier access to your plants, and less stress on your back. Moreover, you have more control over the soil quality, which is crucial for ensuring healthy plant growth.

    One of the key benefits of using raised garden beds is the ability to create the perfect soil conditions. Instead of working with heavy, clay-like, or rocky soil, you can fill your raised bed with nutrient-rich compost, loamy soil, or a custom blend that is tailored to the plants you want to grow. Additionally, raised beds can help reduce weed growth and protect plants from pests, especially when combined with barriers like hardware cloth and landscape fabric.

    For those new to gardening, the ergonomics of raised beds make gardening more accessible and less physically demanding. Raised beds eliminate the need to bend down to ground level, making planting, weeding, and harvesting much more comfortable.

    The Cost of Building Raised Garden Beds

    The cost of building a raised garden bed can vary depending on the size of the bed, the materials you choose, and the tools required. On average, constructing a raised garden bed can cost anywhere between $100 to $300. This includes the cost of lumber, screws, soil, and optional features such as hardware cloth for pest prevention.

    The price fluctuates based on the materials you choose. For example, if you opt for high-quality, durable wood like cedar or redwood, the cost may be on the higher end. On the other hand, if you choose more affordable options like pine or fir, the cost will be significantly lower. Additionally, local soil delivery can also impact the cost, especially if you choose to fill multiple beds at once.

    Selecting the Right Location for Your Raised Garden Bed

    Choosing the right location for your raised garden bed is crucial to the success of your garden. Most vegetables thrive in full sun, so it’s essential to choose a spot that receives at least 6 to 8 hours of direct sunlight per day. Avoid placing your raised bed in areas shaded by trees, fences, or structures unless they face south and won’t block the sunlight.

    If you’re uncertain about the sunlight patterns, it can be helpful to observe the space for a full year. You can also use sun-tracking apps to plan the ideal placement for your garden. Keep in mind that the sun’s path changes with the seasons, so positioning your raised bed carefully is crucial for year-round gardening success.

    Planning Your Raised Garden Bed Layout

    The layout of your raised garden bed plays an important role in optimizing space and ensuring that your plants receive adequate sunlight. In the northern hemisphere, it’s ideal to orient the garden beds in a south-facing direction. This ensures maximum sunlight exposure throughout the year. In the southern hemisphere, the orientation should be reversed, with garden beds facing north.

    For best results, space your raised garden beds at least 28 to 36 inches apart. This spacing allows you to maneuver easily between beds with a wheelbarrow or garden cart, while also preventing overcrowding and shading between plants. If you’re working with limited space, it may be helpful to lay out the dimensions of your planned garden on the ground using ropes or sticks to get a better sense of how much room you need.

    Choosing the Best Wood for Your Raised Garden Bed

    When it comes to constructing a raised garden bed, choosing the right wood is vital for the durability and longevity of your bed. The most common wood options for raised garden beds are cedar and redwood. These woods are naturally resistant to rot and pests, making them excellent choices for building long-lasting beds. Redwood, in particular, is well-suited for areas with a risk of termite infestations.

    If you’re looking for a more budget-friendly option, softer woods like pine and Douglas fir can be used. However, these woods tend to have a shorter lifespan, typically lasting between 3 to 7 years, depending on the climate. It’s important to note that treated lumber, stained wood, or wood from railroad ties should be avoided due to potential toxicity to plants.

    For the best results, opt for wood that is certified by the Forest Stewardship Council (FSC), ensuring that it comes from sustainably managed forests.

    Determining the Size of Your Raised Garden Bed

    One of the main advantages of building your own raised garden bed is the flexibility in design. You can make the beds any size or shape to suit your available space. However, there are some key guidelines to keep in mind for optimal function.

    Width: It’s recommended that raised garden beds be no wider than 4 feet. This allows you to easily reach into the bed from both sides for planting, weeding, and harvesting. If the bed is against a wall or fence, it’s best to limit the width to 3 feet for easy access from the open sides.

    Length: Raised garden beds should generally not exceed 8 feet in length. Longer beds become heavier and more difficult to manage. If you need a larger bed, consider joining multiple smaller beds together to create the appearance of a single continuous bed.

    Depth: The depth of the raised bed should ideally be between 16 to 18 inches. This depth allows for sufficient root growth and water retention. For plants that require deeper soil, consider making the bed even taller.

    Step-by-Step Guide to Building Your Raised Garden Bed

    Now that you’ve selected the location and materials, it’s time to build your raised garden bed. Here’s a step-by-step guide to constructing your bed:

    Step 1: Choose Your Design and Materials
    First, decide on the size of your bed and the type of wood you’ll use. You may want to sketch a design to make sure you have accurate measurements.

    Step 2: Measure, Mark, and Cut the Lumber
    Once you have your materials, measure and cut the lumber to the desired lengths. Make sure to account for the overlap when joining the sides together.

    Step 3: Assemble the Frame
    Start by assembling the shorter sides of the bed and attach them to the corner posts. Use decking screws to ensure the structure is stable.

    Step 4: Add the Long Sides
    Once the short sides are in place, attach the long boards to complete the frame. Ensure everything is square and aligned before securing the boards with screws.

    Step 5: Install Support and Pest Barriers
    If necessary, add additional support beams for longer beds. For added protection, you can line the bottom of the bed with hardware cloth to prevent pests from burrowing.

    Step 6: Fill the Bed with Soil
    Fill the raised bed with a mixture of compost, soil, and other organic materials. Be sure to create a well-draining environment for your plants.

    Pros and Cons of Raised Garden Beds

    ProsCons
    Easier on your back due to elevated heightHigher upfront costs for materials and soil
    Better control over soil qualityMay require more maintenance than in-ground gardening
    Ideal for areas with poor or compacted soilTakes up space in your yard or garden
    Protects plants from pests and weedsPotentially more expensive if not using recycled materials
    Allows for customized plant spacingNeeds proper planning and space management

    Conclusion

    Building a raised garden bed is a fantastic way to start growing your own food, especially if you have limited space or poor soil conditions. By following this guide, you can create a durable and functional garden bed that not only enhances your gardening experience but also improves your yard’s aesthetic appeal.

    Using recycled materials can make the project even more rewarding, ensuring that your raised garden bed is not only sustainable but also eco-friendly. Whether you’re a seasoned gardener or a beginner, raised garden beds offer numerous benefits that can help you cultivate a thriving garden in any space.

    Frequently Asked Questions (FAQs)

    Q1: What is the best wood for a raised garden bed?
    The best wood for raised garden beds includes redwood, cedar, and pine. Redwood and cedar are the most durable, while pine is a budget-friendly option.

    Q2: Can I build a raised garden bed on grass?
    Yes, you can build a raised garden bed on grass. However, it’s recommended to remove the grass or lay down landscape fabric to prevent weeds from growing.

    Q3: How deep should my raised garden bed be?
    For optimal plant growth, your raised garden bed should be at least 16 to 18 inches deep. This allows for proper root growth and moisture retention.

    Q4: How much soil do I need to fill my raised garden bed?
    The amount of soil needed will depend on the size of your bed. A 4×8 foot bed will require approximately 2 cubic yards of soil to fill it to a depth of 16 inches.

    I hope you found this helpful and informative. If so, please leave a review below! Feel free to ask questions in the comments as well.

  • Revamp Your Space: 25 Genius DIY Garden Projects

    Revamp Your Space: 25 Genius DIY Garden Projects

    Introduction
    If you’ve ever stared at your garden and thought, “This needs a refresh,” you’re not alone. Whether you’re itching to organize your tools, add personality to your patio, or create a sustainable oasis, DIY garden projects are the perfect solution. Over the years, I’ve transformed my own backyard from a cluttered mess to a functional retreat using simple, hands-on ideas—no professional skills required. In this guide, I’ll share 25 of my favorite projects, complete with tips, tricks, and lessons learned. Let’s dig in!

    1. Build a Weatherproof Concrete Table

    Concrete tables blend industrial chic with practicality. I crafted mine using a cedar base and tinted concrete mix, which resists moisture and lasts for years.

    Pro tip: Let the concrete cure for at least 48 hours to avoid cracks. Perfect for outdoor dinners or potting plants!

    Materials Needed:

    • Cedar planks
    • Concrete mix
    • Mold (use melamine boards for smooth edges)

    Why It Works:

    • Durable and low-maintenance
    • Customizable size and color

    2. Create a Miniature Succulent Wonderland

    Succulents thrive on neglect, making them ideal for busy gardeners. I designed a tiny desert scene using an old wheelbarrow and thrifted figurines. Add sand, gravel, and a mix of echeverias and sedums for texture.

    Personal Hack:
    Use a shallow container with drainage holes to prevent root rot.

    3. Craft a Tool-Cleaning Station

    Rusty tools? Say goodbye with a DIY cleaning bucket. Fill a sturdy pail with sand and mineral oil—it scrubs off dirt and conditions metal. I keep mine by the shed for quick cleanups.

    Bonus: Add a mesh liner to sift debris.

    4. Design a Low-Maintenance Terrarium

    Terrariums are my go-to for adding greenery to small spaces. Layer pebbles, activated charcoal, and soil in a glass jar, then add ferns or air plants. Place it near indirect light, and mist monthly.

    Avoid: Overwatering—succulents and cacti prefer dry conditions.

    5. Plant a Mini Evergreen Garden

    For year-round color, combine dwarf conifers like Mugo pine with perennials like heuchera. I lined mine with moss to retain moisture and added polished stones for contrast.

    Best For: Balconies or tabletops.

    6. Assemble Concrete Paver Planters

    Skip the mess of mixing concrete—use pavers instead! Stack them vertically or horizontally, secure with construction adhesive, and fill with soil. I used this method to create sleek herb planters for my patio.

    Cost: Under $20 per planter.

    7. Repurpose Furniture into a Gardening Station

    An old china cabinet got a second life as my outdoor storage hub. After sanding and painting it teal, I added hooks for tools and labeled bins for seeds.

    Key Tip: Use outdoor-rated paint to withstand weather.

    8. Upcycle Bottles into Bird Feeders

    Turn wine bottles into chic feeders by wrapping copper wire around the neck and attaching a wooden perch. Fill with sunflower seeds, and watch finches flock to your yard.

    Eco-Friendly Bonus: Reduces glass waste.

    9. Frame a Living Succulent Art Piece

    I mounted succulents on a shadow box frame filled with soil and moss. Hang it indoors or under a covered porch—just water sparingly!

    Variation: Use a vintage picture frame for a rustic look.

    10. Craft Log-Slice Stepping Stones

    After a storm downed a birch tree, I sliced the trunk into stepping stones. Stain them with walnut ink for a weathered finish, or leave them natural.

    Safety Note: Seal with polyurethane to prevent rot.

    11. Hang a Wooden Basket Planter

    I wove a basket from cedar strips, lined it with moss, and planted trailing ivy. Hang it near a window for a cascading green display.

    Beginner-Friendly: Use pre-made baskets to save time.

    12. Weave Dogwood Branches into Garden Orbs

    Pruned dogwood branches? Twist them into orbs for garden decor. I added fairy lights to mine for evening ambiance.

    Pro Tip: Soak branches in water first for flexibility.

    13. Label Plants with Chalkboard Markers

    Paint wooden stakes with chalkboard paint to label herbs and veggies. I update mine seasonally—no more forgotten seedlings!

    Cost: Under $5 for a set.

    14. Install a Compact Pond Box

    No yard? No problem! I turned a plastic storage bin into a mini pond with water lilies and a small pump. Place it on a balcony or deck for a serene vibe.

    Maintenance: Clean monthly to prevent algae.

    15. Grow a Mini Herb Garden

    In a wooden crate, I planted basil, thyme, and mint. Add pebbles for drainage and place it near a sunny window. Fresh pesto, anyone?

    Quick Tip: Trim herbs regularly to encourage growth.

    16. Build a Rain Barrel from a Trash Can

    Cutting my water bill was a game-changer. I drilled a spigot into a garbage can, added a mesh filter, and placed it under a downspout.

    Savings: Collects 50+ gallons per storm.

    17. Mold Concrete Garden Spheres

    Using old Christmas ornaments as molds, I created concrete spheres. Dab them with green paint for a mossy patina.

    Creative Twist: Embed seashells or tiles before drying.

    18. Paint Terra-Cotta Pots

    Give plain pots a makeover with metallic paint or stencils. I used gold leaf for a luxe finish—they’re now my patio’s focal point.

    Durability: Seal with outdoor varnish.

    19. Construct a Pallet Potting Bench

    Pallets are a goldmine for DIYers. I built a bench with storage shelves and added a chalkboard panel for notes.

    Customize: Add wheels for portability.

    20. Organize Tools with a Pallet Rack

    Mount a stained pallet on your shed wall and attach hooks for shovels and rakes. My tools have never been so accessible!

    Time Saver: Label hooks for quick grabs.

    21. DIY Compost Bin from a Trash Can

    Drill aeration holes in a bin, add kitchen scraps, and let nature work. My compost enriches soil in just 2–3 months.

    Do Compost: Fruit peels, coffee grounds, leaves.
    Avoid: Meat, dairy, oils.

    22. Marbleize Terra-Cotta Pots

    Swirl acrylic paints in water, dip pots, and let dry. Each one is unique—I gifted these at my last garden party!

    Sealant: Use Mod Podge for longevity.

    23. Grow Herbs Vertically with Pallets

    Attach small pots to a pallet leaned against a fence. My vertical herb garden saves space and looks Instagram-worthy.

    Ideal Herbs: Rosemary, parsley, cilantro.

    24. Build a Raised Garden Bed

    Using untreated lumber, I built a 4×4 bed for veggies. The elevated design reduces back strain and improves drainage.

    Soil Mix: Combine compost, peat moss, and vermiculite.

    25. Craft a Succulent Wreath

    Soak sphagnum moss, shape it into a wreath form, and tuck in succulent cuttings. Mine hangs on my front door and thrives with weekly misting.

    Longevity: Succulents root into the moss over time.

    Pros and Cons of DIY Garden Projects

    ProsCons
    Budget-friendlyTime-intensive
    Customizable designsRequires basic tools/skills
    Eco-friendly (upcycles materials)Weather-dependent for outdoor work
    Boosts curb appealTrial-and-error adjustments

    FAQs

    Q: What are the easiest DIY garden projects for beginners?
    A: Start with chalkboard plant markers, miniature herb gardens, or pallet organizers. They require minimal tools and time.

    Q: How do I protect outdoor projects from rain?
    A: Use weather-resistant materials like cedar, outdoor paint, and concrete. Seal wooden items with polyurethane.

    Q: Can I complete these projects in a weekend?
    A: Yes! Projects like terrariums, bird feeders, or marbleized pots take 1–2 hours.

    Q: What if I don’t have a green thumb?
    A: Opt for low-maintenance plants like succulents, snake plants, or herbs.

    Conclusion

    Transforming your garden doesn’t require a hefty budget or expert skills—just creativity and a willingness to experiment. From functional storage hacks to whimsical decor, these 25 DIY garden projects cater to all skill levels and spaces. As someone who’s accidentally killed more plants than I’d like to admit, trust me: Start small, learn as you go, and celebrate every bloom. Your dream garden is just a project away!